

- You are here:
- Home »
- Blog
How Would A Properly Structured Asset Allocation Portfolio Have Fared During The 2002 and 2009 Market Downturns?
Here lately, we’ve been having some great debate on a post I wrote in April 2013 looking at the Infinite Banking Concept, which employs whole life insurance as a savings vehicle.
One of the biggest draws of using whole life insurance in this manner is that your money can grow at a modest 4.5% average annual rate (historical average return / cash value increase rate), while at the same time, being guaranteed that your cash value will not decrease. Since life insurance companies are perhaps the most stable in our economy, it goes without saying that your money is very secure.
Naturally, this security and opportunity for a modest growth rate has attracted many risk-adverse investors, particularly ones that were “burned” during the 2002 and/or 2009 market downturns. Many of these folks cite that their retirement portfolio “became worthless” as a result.
However, would your portfolio really have become worthless during one or both of these market downturns if it was a properly allocated passive investing portfolio of index mutual funds? Or, were the people that have these type of “horror stories” over-allocated to stocks, investing too much in individual stocks (a losing game in and of itself) and/or risky IPOs?
The purpose of today’s post will be to look in to how a CORRECTLY STRUCTURED portfolio would have fared during the two market downturns after the millennium.
Structure of Example Portfolio / Asset Allocation Target %’s
Because I am curious how my portfolio would have fared during these time periods, we will use my current asset allocation %’s as an example for our analysis. This is not to say my portfolio is perfect by any means, but I do have a little bit of experience with passive investing!
Listed below are the specific index fund components I employ in my investing strategy. I use a 70% equity / 30% fixed income asset allocation split, with good exposure to international stocks as well. Although I use a mixture of money market mutual funds and online high yield savings accounts for the cash portion of my asset allocation, for simplicity, we will just assume here that my cash is earning 0% (so not a + or – return).
- Cash (Target 10%)
- Vanguard Short Term Bond Index (MUTF:VBISX) (Target 12%)
- Vanguard Inflation-Protected Secs (MUTF:VIPSX) (Target 8%)
- Vanguard Total Intl Stock Index (MUTF:VGTSX) (Target 10%)
- Vanguard Emerging Mkts Stock Idx (MUTF:VEIEX) (Target 11%)
- Vanguard Total Stock Mkt Idx (MUTF:VTSMX) (Target 7%)
- Vanguard Small Cap Index (MUTF:NAESX) (Target 7%)
- Vanguard Small Cap Value Index (MUTF:VISVX) (Target 13%)
- Vanguard Value Index (MUTF:VIVAX) (Target 12%)
- Vanguard REIT Index (MUTF:VGSIX) (Target 10%)
Defining Worst Case Time Periods
As a first step, we need to define the periods in which we’ll analyze the portfolio performance. In looking at the S&P 500’s history, the time periods shown below represent the worst case high to low transition periods during the 2002 and 2009 market downturns.
- September 1st, 2000 –> October 4th, 2002, during which time, the S&P 500 declined in value by 47%.
- October 5th, 2007 –> March 6th, 2009, during which time, a market decline of 55% occurred.
From these facts alone, it is important to realize that already, a 50% downturn, although terrible, does not equate to a portfolio “becoming totally worthless,” provided only that you invested in an S&P 500 index fund instead of individual stocks.
Having defined the example portfolio’s components along with the target analysis time periods, I then proceeded to extract historical pricing data from Yahoo Finance for the mutual funds listed above.
You can view of the data for the analysis in this post at the Google Drive spreadsheet link below:
Analysis # 1 – No Rebalancing
The first thing I was curious to investigate is how the individual portfolio/asset allocation components performed on their own during the 2000-2002 and 2007-2009 periods without any rebalancing. For simplicity, throughout this investigation, I assumed a $100,000 starting portfolio value at the beginning of each market decline and that no additional funds were added to the portfolio at any time.
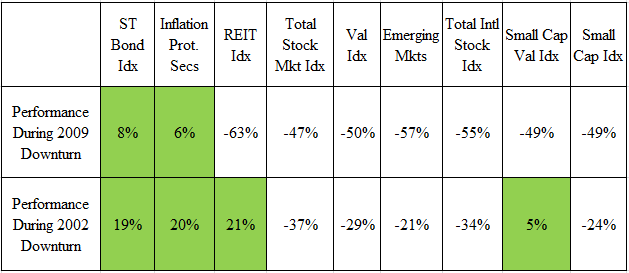
The table below displays the % increase or decrease (- % value) that portfolio components experienced during the 2 market downturn periods. From this table, there are several fascinating observations that can be made:
- The 2002 market downturn was much more “forgiving” compared to the 2009 one. For example, in the 2002 event, even though the overall stock market had decreased close to 40%, small cap value, REIT, TIPS, and bonds all experienced pretty significant positive returns that would have greatly stabilized your portfolio.
- Unfortunately, in the 2009 crisis, the only two portfolio components in the positive return range were the TIPS and short-term bond funds, which is what they are designed to do.
Having looked at the performance of the individual components in isolation, the next step was to examine the overall portfolio performance when all of the asset classes are combined, as it would be in “real life.”
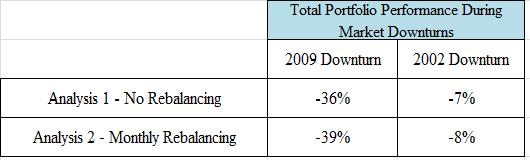
The return data for the combined portfolio can be seen in the table below (Analysis 1 – No Rebalancing line).
- As we mentioned previously, from September 1st, 2000 –> October 4th, 2002, the S&P 500 declined in value by 47%.
- However, if you had a diversified, passive investing portfolio like the one mentioned above, your portfolio would have only declined by 7% in value. This represents an 85% improvement in performance over the market!
- From October 5th, 2007 –> March 6th, 2009, the S&P 500 declined 55%.
- Similarly, a properly diversified portfolio would have saved you during the 2009 crisis as well, although not by as drastic of a margin as in 2002, with the diversified portfolio declining in value by 36% by 2009 vs. the 55% decrease of the S&P 500.
So again, we see that a properly structured retirement portfolio would not have “become worthless” during either of these market declines.
Analysis # 2 – Monthly Rebalancing
As a next step, I wanted to investigate the impact that monthly rebalancing (back to your asset allocation targets) would have on portfolio performance during these periods. The results can been seen in the table below (Analysis 2 line).
Intriguingly, rebalancing did not have that significant of an effect during both of the market downturns, and when it did have an effect, it was slightly negative. This may have been due to the majority of the equity asset classes declining in value in a correlated/together manner, instead of one going up while another goes down.
Another thing that is important to point out is in relation to the decision when you first construct a portfolio of how much equity vs. fixed income exposure you want / how much risk you can take.
- For example, on page 171 of Larry Swedroe’s book, The Only Guide to a Winning Investment Strategy You’ll Ever Need, there is a table that I used to help me determine how much equity allocation I should carry in my portfolio.
- For an equity allocation of 70%, it says that you should be able to withstand/tolerate/expect a decline in portfolio value of 30% in a single year. For an equity allocation of 60%, this value decreases to a 25% decline.
- Since the 2009 and 2002 downturns occurred over more than a year, you could say that the % decreases in the table above of the overall portfolio values (for a 70% equity portfolio) can almost be “expected” at some point or another, given the amount of risk you’ve exposed yourself to.
Conclusions
Overall, it’s clear to say that the 2002 and 2009 market downturns were depressing and full of desperation.
However, if we construct a passively managed portfolio (avoiding the risk of individual stocks) with a proper asset allocation and objectively compare the portfolio performance during the decline periods, we see that the portfolio behavior reverts to same risk/return tradeoff that must be considered upon first creating a portfolio.
To me, this really just highlights the importance of considering the risks of investing when you first start, not get too greedy or hyper-nervous, and make sure to give yourself adequate fixed income allocation to provide safety for you to sleep well at night.
How about you all? How did your overall portfolio do during the 2009 and 2002 market declines? Do you currently have a sufficient asset allocation for your risk tolerance?
Share your experiences by commenting below!
How To Make Your Own Wine For $1 Per Bottle In 1 Week

 Being a big fan of wine, I have naturally touched on the subject multiple times throughout the 4+ year history of MPFJ.
First, we investigated the long term financial ramifications of choosing to drink cheaper vs. more expensive wine, seeing that you could save upwards of $42,924 over your lifetime by drinking $3 per bottle wine instead of $10 per bottle wine. Next, we explored whether screw-cap wine or real cork-bottled wine tasted better, and saw that not only do screw-cap wines generally cost less, but they are scientifically a better form of bottle closure. Finally, we discussed if wine can really make you live longer and saw that there was more consensus on the benefits for men vs. women.
Today, I wanted to continue the discussion of wine-related topics by sharing how I’ve discovered I can make my OWN WINE at home for about $1 per bottle! Being someone interested in personal finances/frugal living/saving money and also bioscience (wine is a product of fermentation after all!), this is fun topic for me.
Step 1 – Set Your Expectations
The first step in getting started making your own quick, cheap $1-per-bottle wine is to accept that the product you’ll be making likely will not have the same taste as a $10 bottle from the store. Instead, the goal here is to brew up something that is “drinkable,” has between 10-18% alcohol content like normal wine, to have some fun learning about the winemaking process, and enjoying the fact that you concocted a homemade product for a cheap price!
If you want to make your own home-made wine that is of higher quality (and does taste like wine you’d buy from the store – this is what my fiance does in our condo, and it comes out quite nicely!), you’ll need a more complete/official wine making kit and about 2-3 months of processing time vs. the 1 week that we’re talking about here. If you’re interested in getting more professional about the wine making process, I’d recommend shopping at an online provider such as EC Kraus (where my fiance gets her supplies), or doing a Google search for “home wine making” in your local area for a store close by.
Step 2 – Gather The RIGHT Supplies You’ll Need
Let’s walk through each item you’ll need one-by-one to make your own wine in 1 gallon increments:
Juice – Total Cost Per Gallon of Wine = $3.00
At the core of the home wine-making process is the fruit juice/sugar source that feeds the yeasts’ fermentation metabolic system.
In order to create 1 gallon of homemade wine, you’ll need 2 frozen cans of juice concentrate from the grocery store. So far, I’ve made wine with the following juice types with various levels of success, and as such, I’ve added my experiences corresponding with each:
- Red grape juice – This has by far been the most successful fruit juice I’ve tried thus far. It provides a nice level of sugar source for the yeast to chew on, is pretty cheap, easy to find at the store, and most importantly, the red grape juice hides a lot of the off-flavors that can commonly be produced by creating a cheap wine.
- Apple juice – Apple juice worked pretty well as a wine base. However, once all of the sugar was gone from the juice, the resulting wine tasted a little “funky.”
- White grape juice – White grape juice is fermented very quickly by the yeast, often in only about 3 days. However, I’ve found that the resulting product has some off-flavors that are normally settled out by a combination of fining agents and several months of time during the normal wine making process.
- Pineapple juice – Much to my surprise, pineapple juice works pretty dang well as a wine base. It ferments very aggressively, producing a nice amount of alcohol content. Further, there aren’t that many off flavors produced.
- Fruit punch and limemade – The last two that I’ve tried are fruit punch and limemade juice concentrates. With both, the fermentation seems to stop at around 5% alcohol content. I’m guessing this is due to an unfavorable environment being provided by these juices. However, since the alcohol content is lower, I’ve found that these wines are nice for mixing with the off-flavor varieties mentioned above in order to create a more palatable product so the wine doesn’t go to waste.
1 Gallon Jug With Cap – Total Cost Per Gallon of Wine = Free
Having selected your fruit juice concentrate, the next task is to find a container to put it in. For this, you can simply use an empty milk jug. Or, if you’re feeling really fancy, you can buy a $0.50 1 gal water jug from the store.
Yeast – Total Cost Per Gallon of Wine = $0.50
Of course, fruit juice cannot be turned in to wine without our favorite microbe – yeast.
When I first started my winemaking journey, I simply used bread yeast purchased from the grocery store. However, I could not seem to avoid the distinct resulting “bread” smell/taste that it would produce. And, after finding out that wine yeast was about the same price, I switched away from bread yeast and have not looked back!
The type of wine yeast I use right now is a Lalvin brand strain called EC-118. I use this yeast because it seems to be the most “robust” and versatile strain that they have. I purchased a 10 pack of this yeast on Amazon for around $5.00, which equates to about $0.50 per gallon since 1 yeast packet is needed for each gallon of wine made.
Sugar – Total Cost Per Gallon of Wine = $0.50
Unfortunately, the sugar that exists in store-bought juice concentrate is not quite enough to make wine-level alcohol content. Therefore, you need to supplement the 2 cans of fruit juice concentrate in each gallon of wine with about 2-3 cups of regular table sugar.
A 10-pound bag of normal white sugar can be purchased from the store for $5.00. According to an online sugar converter, 2 cups of sugar weights approximately 1 pound, so this 10 pound bag of sugar will last quite a while!
Water – Total Cost Per Gallon of Wine = Negligible since tap-water is fine (no need to worry about contamination, etc).
Miscellaneous Supplies to Make the Process Easier – Total Cost Per Gallon of Wine = Negligible since likely already have in kitchen.
In my experience, there are a couple simple household items that make the wine making process a whole lot easier!
- The first item is a turkey-baster, or something similar, which can be used to suck out small quantities of the wine from the container during fermentation to taste the product and see how it is progressing.
- The second item is a funnel. This makes it a lot easier to dump in the juice concentrate, water, and sugar in to the small hole on the 1 gallon container.
- The third set of items is a rubber band and seran wrap. Since the fermentation progresses pretty aggressively once it has started in earnest, it usually results in some spillage of bubbles out the top of the jug. By placing a rubber band and seran wrap over the partially open cap, it prevent this from getting all over the place.
- The fourth item is a cookie sheet and aluminum foil. This prevents the spillage from getting your counters or table all messy.
- The fifth item is a vessel to store the completed wine in once fermentation is complete.
Total cost per 1 gal of wine = $4.00.
- 1 gal of wine = 3.78 liters. Assuming you lose a little bit of the wine during the process, you yield 3 liters of wine. 1 bottle of wine = 0.75 L, so you yield 4 bottles of wine, or a cost per bottle of $1.
Step 3 – Putting the Ingredients Together
Having gathered the required ingredients, now comes the easy part – actually making the wine. Once you get the hang of this, you can often start a new batch of wine in less than 5 minutes!
- To get started, thaw out the frozen juice concentrate completely.
- Fill up the 1 gal jug with tepid (not hot or else you will anger the yeast!) water about 1/3 of the way full.
- Add the yeast, invert multiple times to mix.
- Add the 2 cups of sugar using the funnel.
- Add the 2 containers of thawed juice concentrate.
- Invert jug multiple times to mix well, making note that the sugar has completely dissolved and is no longer stuck to the bottom.
- Cap the jug. However, immediately pop open one side of the cap so that the CO2 pressure from the fermentation can properly vent (and so your wine vessel doesn’t explode!).
- Cover the cap of the jug in seran wrap, and then secure the seran wrap in place with the rubber band.
- Place the vessel on top of the alumninum foil-covered cookie sheet to keep your area clean.
Step 4 – Sit Back and Watch Science Turn Juice in to Wine!
Having combined the ingredients, now all you have to do is sit back and watch the fermentation happen.
You should expect the yeast to take 12-24 hours to acclimate to their new environment. After that, you should see aggressive bubbles coming up through the juice for the next ~3-7 days.
After the bubbling has ended, simply pour out the wine in to another vessel, leaving behind the yeast sediment in the original fermenter to clean up and throw away.
Personally, I like to refrigerate the wine that I make in this fashion. However, that part is up to you. Now you can enjoy your product with friends, or by yourself!
How about you all? Have you ever made your own wine or beer? How did the process turn out? Were you able to do it cheaper or more expensive than wine bought at the store?
Share your experiences by commenting below!
***Photo courtesy of http://www.flickr.com/photos/uncalno/8538709738/sizes/l/
A Complete Guide To Saving Money On Your Taxes By Cleaning Out Your Closets

 The following post is by MPFJ staff writer Travis. Travis is a customer blogger for CareOne Debt Relief Services, and also appears weekly at Enemy of Debt. Travis candidly shares his personal journey to pay off $109,000 of credit card debt and the tips he’s learned along the way. As a father and husband he provides a unique perspective on balancing debt, finances, and family.
I was doing my usual routine of putting away laundry on Sunday night when I realized that I had more shirts than I did hangers. As I went through the closet piece by piece looking for unused hangers hiding between shirts, I shook my head realizing I don’t wear more than a third of the pieces of clothes that I own.
It was time to do a closet purge.
I went through not only my closet, but also my dresser drawers removing anything that I hadn’t worn within the last year. When I had finished, there was a massive pile of clothes in the middle of my bedroom floor.
Normally, this is where I would stuff everything into a couple of heavy duty garbage bags and drop them off at Goodwill. The last time I did this, my neighbor asked me if I had received a receipt for my taxes. I remembered being asked by the guy at the donation center if I wanted one, and I knew I could use charitable donations to benefit my tax return, but I just didn’t know enough about the process so I declined.
So, I did some research on donating non-cash items to charity.
It turns out you can’t just load up some garbage bags with your old stuff, throw them out the back of your van at the Goodwill drop off center while barely slowing down, and write a random dollar value on your tax forms.
There’s some things you need to know about when donating non-cash items to charities.
1. Charities can’t sell worn out or broken items. I separated my clothes into two piles. One of clothes that were soiled, stained or ripped, and another of clothes that were in gently used condition. The first pile was loaded into a garbage bag and tossed outside to be disposed of.
2. You have to estimate the value of your donation to report on your tax return: I separated the pile of gently used items by type: shirts, pants, sweatshirts, and sweaters. Then I grabbed my laptop, and created a spreadsheet inventorying every article of clothing I was going to donate.
Then, I downloaded the donation value guide from Goodwill’s website and assigned a value to each item of clothing, letting the spreadsheet add up the total for me.
3. You have to have documentation to prove you actually donated your items: I printed out the spreadsheet, and loaded the clothes into bags and into my van. Once I got to Goodwill, a gentleman helped me unload my items, and asked if I wanted a receipt. At my request, he signed and dated a receipt and gave it to me. I also asked him to sign and date my printed spreadsheet just for cross verification of my donation.
Of course, this isn’t quite the end of the story, as there is another chapter to this story once you reach tax time.
- Donations to charities are only reported on your taxes when you can itemize deductions. If you commonly use the standard deduction, going through the effort to assign a value to your donation may not be a good use of your time.
- Non-cash donations such as these will be reported with your other itemized deductions on Schedule A of tax form 1040
- To claim a donation of property valued at $250 or more, you must have written acknowledgement from the receiving organization describing the property donated. This is why I had the Goodwill employee sign and date my spreadsheet, as well as fill out (and sign) the receipt given by them with a general description of what I donated.
- If the total of all non cash contributions in a given year exceeds $500, you must fill out section A of IRS Form 8283 as part of your tax return.
- I can’t see myself doing this anytime soon, but it’s worth mentioning that if you ever donate a single item, or a group of similar items that has a value exceeding $5000, you’ll need to fill out Section B of Form 8283 which requires a qualified appraisal of the item(s), and include them with your tax return.
As I drove across town home from dropping of my items at Goodwill, I wondered just how much my donation would save me on my taxes. Doing a little research, charitable contributions will save you roughly 25 cents for each dollar you donate. It does depend on what tax bracket you fall into, but it’s a good guideline to start with.
Using the guideline from Goodwill, I estimated the value of my donation at $207. Twenty-five percent of that is just under $52. Looking ahead, we’ll be doing the same closet purge for each of the four members of my family. Doing a little rough estimating, that means that we could potentially have $828 worth of donations to Goodwill this year, with a rough savings on our taxes of $207.
Cleaning out our closets accomplishes three goals:
1.) Declutters our home
2.) Provides quality items to charity that can help less fortunate people
3.) Saves us money on our total tax bill.
It did take some time to enter all the items and their estimated values into the spreadsheet. However, the effort of cleaning out my closet and drawers, separating gently used from throw away items, and dropping the items off at Goodwill are things I was going to do anyway.
How about you readers, do you donate items to charity? Do you claim them on your taxes or do you do what I did and just drop them off?
Image courtesy of Stuart Miles / FreeDigitalPhotos.net
A Personal Example of Building and Using a Home Maintenance Savings Fund

 Almost four years ago when I first purchased my condo coming in to graduate school, I discussed the various ways that I adjusted my monthly zero-based budget to take on the task of home ownership.
One of these ways was to set up an automatic monthly transfer from my checking to savings account for a set amount that would help me accumulate 1% of my home’s total market value over a 1 year time period. The idea for having this money on hand was to be able to pay for periodic maintenance that needed to be done on my property (without dipping in to an emergency fund or a credit card), since I no longer would have a landlord to call to take care of these items as they pop up. Thus began my home maintenance savings account.
Why was 1% chosen as my target savings value? Since this was my first experience of home ownership, I took this recommended value from one of my favorite personal finance books, Personal Finance for Dummies by Eric Tyson. This value seemed appropriate since my condo was in pretty good shape when I purchased it. Of course, this value may need to be amended for your specific circumstances.
Slowly, Automatically Building a Home Maintenance Savings Fund
Having set up the automatic monthly transfer for my home maintenance fund, it took essentially no thought and no effort on my part to accumulate the money over the 1 year build-up period. The money was simply withdrawn automatically and immediately after I would get paid.
Before I knew it, a year had passed, and it was time to cancel the monthly recurring transfer since my maintenance fund was completed. On top of that, I had added several extra hundred Dollars for safe measure. Of course, if any maintenance expenditure were to arise, I would need to replenish the withdrawn fund from the account to keep the 1% home value target.
Electrical Problems
Having built up my home maintenance fund, I then waited for the first time I would need to tap in to it. And wait I did – for almost 3.5 years in fact!
From August 2010 – January 2013, I luckily did not have one significant maintenance problem that couldn’t be fixed with a little do-it-yourself caulking around the shower and kitchen sink piping.
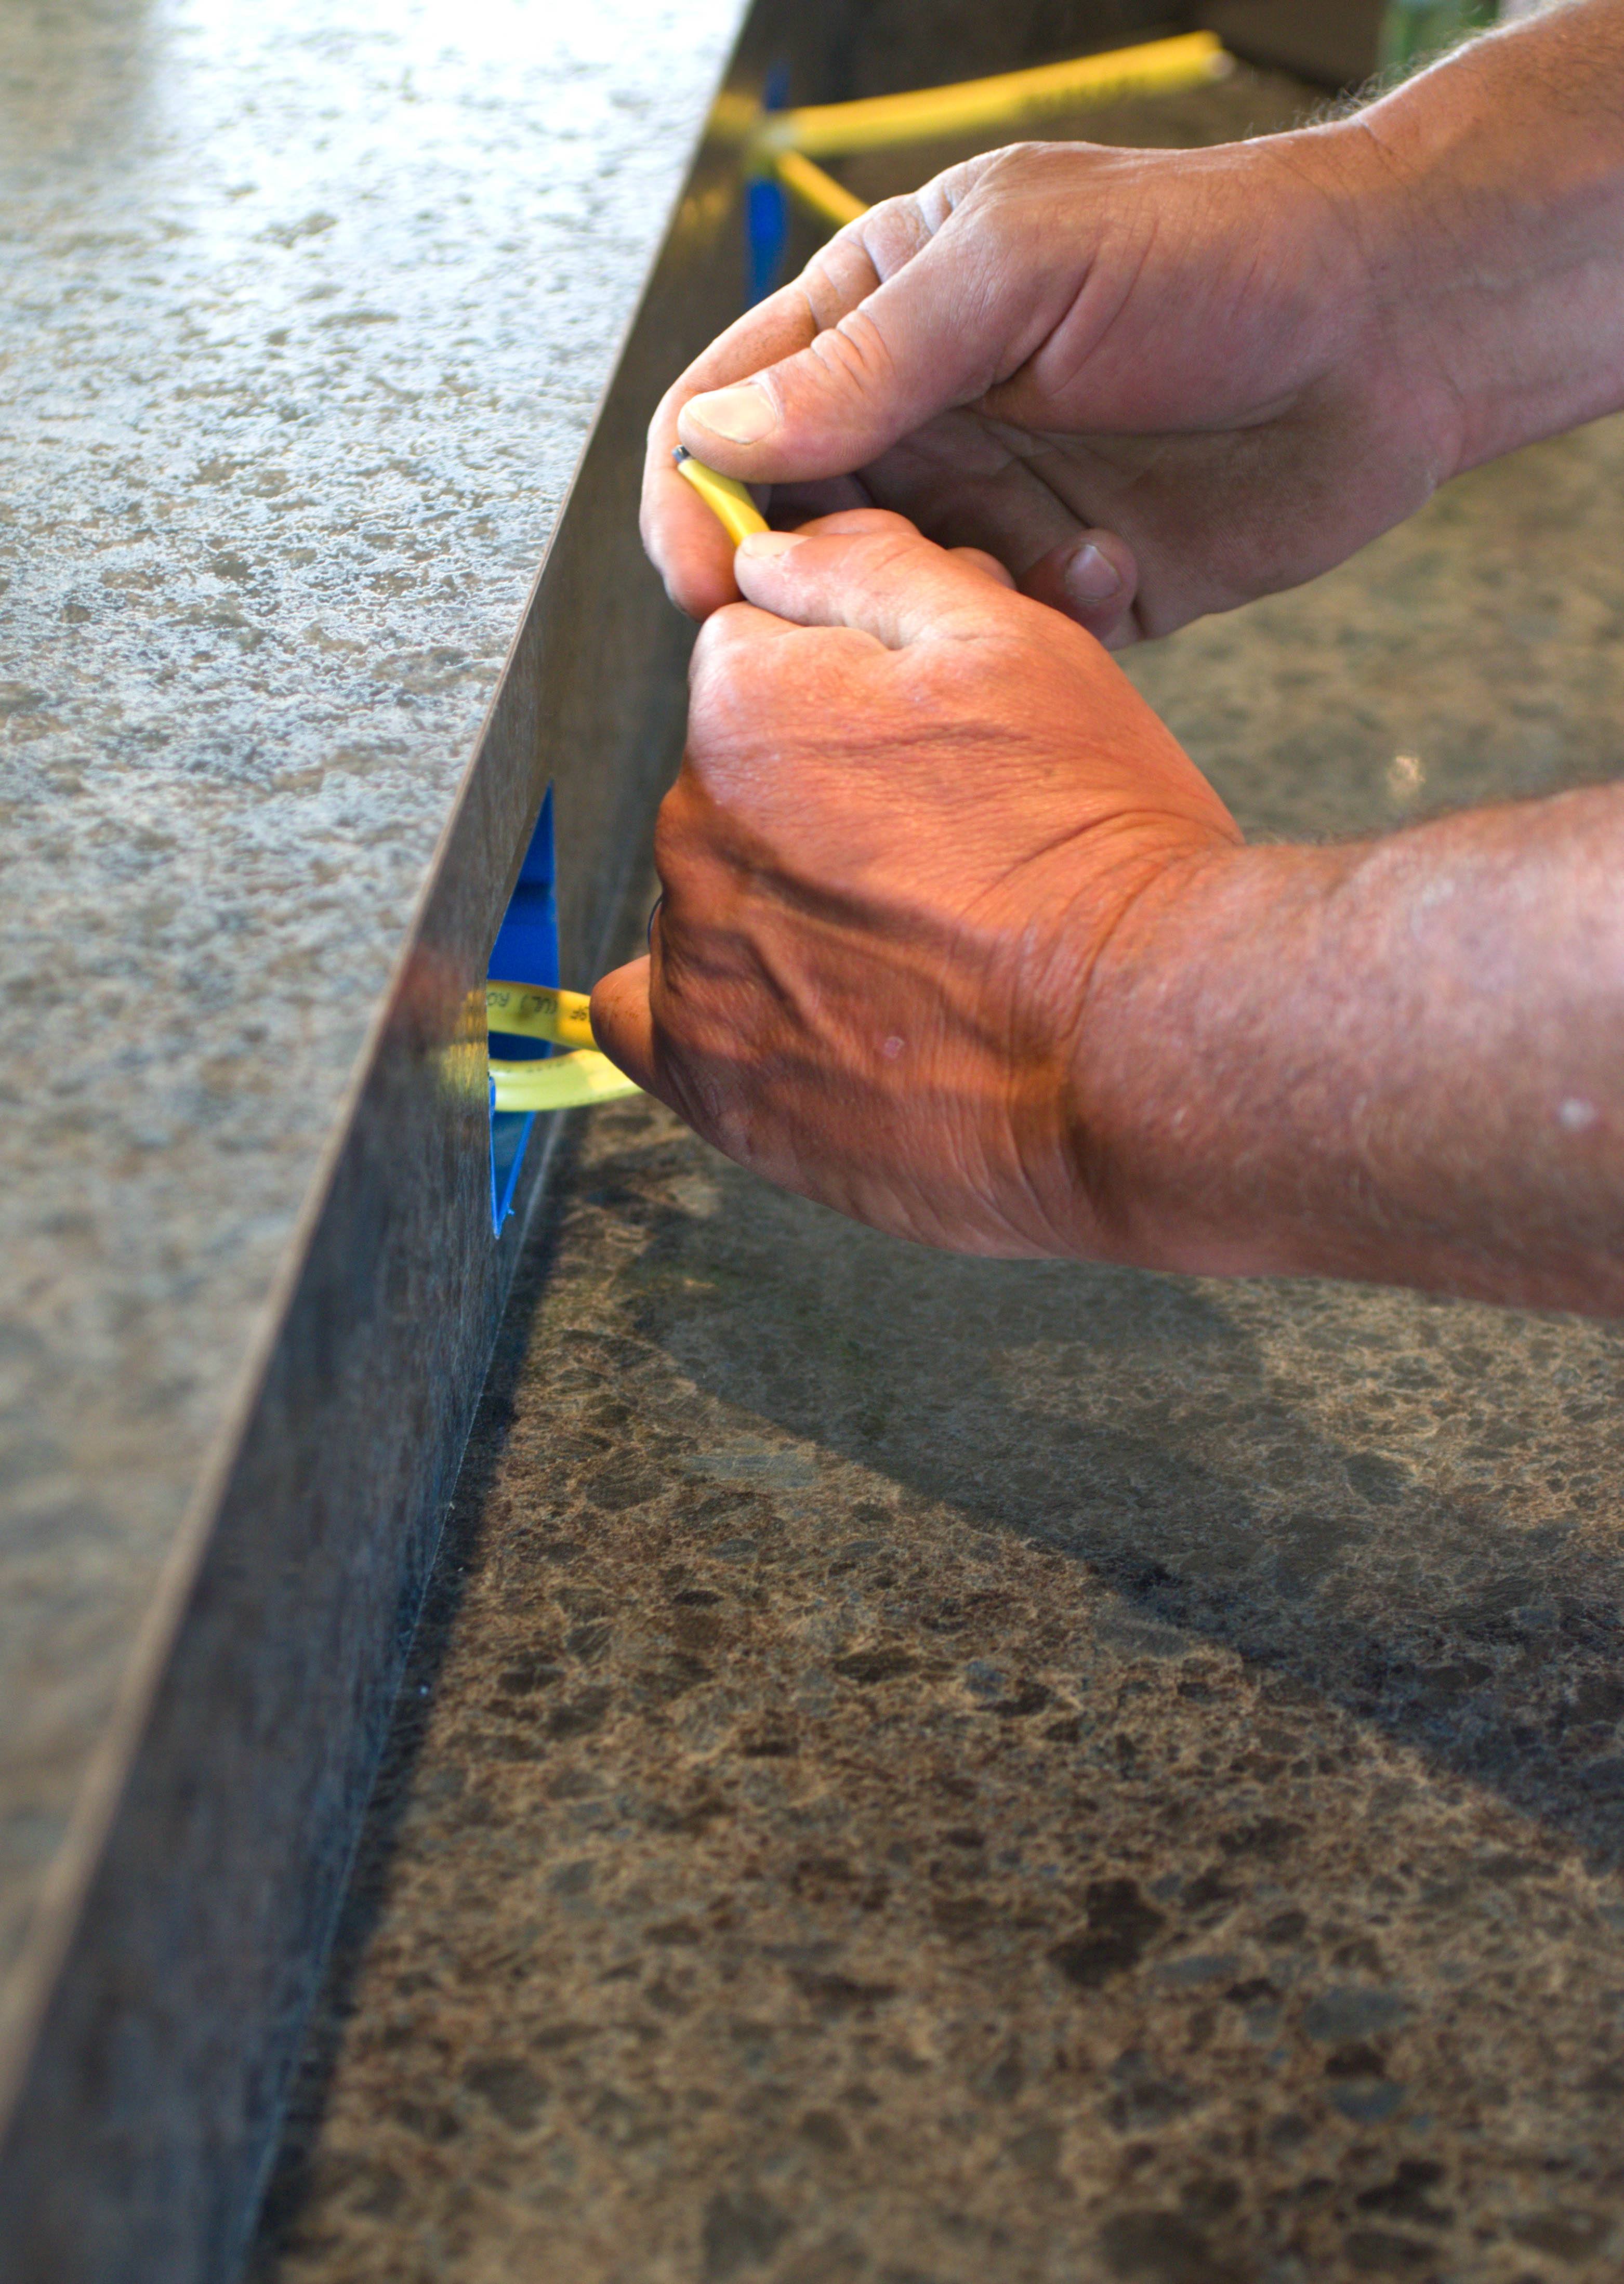
However, that all changed last month when the electricity for an entire circuit breaker portion of our condo went out. At first, I just thought that the fuse in the circuit breaker had blown, and so I drove around town and after visiting 4 electrical supply stores, I procured a suitable replacement. However, that did not correct the problem.
Since I am by no means a qualified electrician, I decided it was time to call in a reputable professional. The way the billing is set up for the service we called was that it was $90 for the first 15 minutes, and then around $90 for each additional 30 minutes thereafter. Clearly, the most expensive part is simply getting them to show up for a visit.
After checking out the problem, the electrician found that the issue was rooted in the fact that our condo has aluminum wiring instead of the standard copper used nowadays, since our condo was built during a time when there was a copper shortage. Anyhow, he fixed what he thought was the problem, and everything seemed to be all right.
- Total cost for first visit = $188.
However, 2 hours after the electrician left, the electricity in the same area of the condo went out again because of a separate issue caused by the aluminum wiring causing an outlet in the guest bedroom to melt the plastic. Thus, we had to get the electrician back to the house a couple days later.
- Total cost for second visit = $128.
Water Heater Problems (When It Rains, It Pours – Literally)
At almost the same time this electricity issue reared its ugly face, I had started to notice that the hot water would run out much quicker than it usually does while taking a shower. I figured this was simply a result of the water heater being old and there being record low temperatures in Virginia where I live in January.
After coming back in to town from a trip home to see my parents, I noticed that the problem still hadn’t corrected itself, despite being warmer outside. Thus, I finally decided to go out on my back porch and check the closet where the water heater is housed. Since the weather has been pretty terrible lately, my fiance and I had not been out on the porch for a couple weeks probably.
Much to my surprise, copious amounts of water were overflowing from the water heater and spilling out over the balcony to the patio below.
What this meant was that the water heater was continuously making hot water because it was leaking (never stopped because it could not fill itself up completely). Talk about a waste of resources/money/the environment!!!
Anyhow, we called up a plumber to assess the issue, and they quickly identified that the water heater had burst and needed to be replaced. They said that it was likely the original from when the condo was built 30+ years ago, so it definitely had some life to it!
Because the unit needed to be special ordered, he would have to come back the next day and install it.
- Total cost for 3rd visit = $90.
- Total cost for installed new water heater on 4th visit = $1090.
Total Repair Cost and Lessons Learned
So, altogether, the home maintenance repairs had costed me a total of $1,500, almost exactly the 1% of the purchase price of my condo, $105,000, plus the extra few hundred Dollars I had thrown in for safe measure. Pretty coincidental how that was exactly the amount of my home maintenance fund, eh!?
Overall, I feel pretty satisfied with how the repairs went. Furthermore, I feel fairly lucky that the damage caused by the melted plastic/aluminum wiring or the flood of dripping water did not cause anymore damage than to just the equipment described here. If my water heater had been in a more interior part of my house or in a finished basement, the water damage culminating from the 2 weeks it had been overflowing could have been extensive.
To this end, one lesson I learned through all of this is the importance of periodically (maybe 1x every 2 weeks) checking/visually surveying your house, specifically your heavy appliances such as furnace, water heater, A/C unit, etc for signs of malfunction. This is especially true for places (like my outdoor patio closet) where you don’t see on a typical day-to-day basis.
How about you all? Do you have a home maintenance savings fund? If so, how much do you typically keep in it and why?
Share your experiences by commenting below!
***Photo courtesy of http://farm8.staticflickr.com/7277/7624022844_b08d0eaf71_o.jpg
The High Cost of Comparison

 The following post is by MPFJ staff writer, Catherine Alford. Cat is a freelance personal finance writer who blogs at www.BudgetBlonde.com.
Comparison is a natural part of everyday life.
We automatically compare prices on produce at the grocery store, clothes in the mall, and yes, even the way we raise our kids and interact with our families.
Comparison can be healthy in many ways. For example, you might compare yourself to a more established colleague or a writer you admire, trying to find ways to improve yourself or better your surroundings.
Comparison can be used as a personal gauge as well. I like to compare where I am now to where I was a few years ago. The comparison shows me how much I’ve grown, developed, and matured.
Yet, there’s a darker side to comparison, too.
There’s the mom who seems to always have it together who makes you feel like you’re not doing well enough. There’s the husband who constantly takes his wife out on dates, when it seems yours just wants to relax and watch the game. Then, there’s the skinny celebrities, the wealthy next-door neighbor with the new BMW, and your co-worker who got the promotion you’ve always wanted.
The types of comparisons listed above can be a danger not only to your relationships but your finances as well. They can cause undue strain on your life and unrealistic expectations.
Let’s take a look:
Dangers to Relationships
Comparing your relationship to other ones is a natural part of life. However, it’s when the negative thoughts creep in that it can deeply affect the way you go through life: “They always seem so in love.” “He regularly buys her flowers just because.” “I wish my husband did that.” “I wish my wife always had dinner ready like his wife.”
Raise your hand if any of these thoughts have run through your mind before, especially when you’re out to dinner with friends or checking your Facebook newsfeed.
Even though comparison is a pretty natural part of life, the way to get around the negative impact is to remember people are always going to put their best foot forward. I’m hardly going to post a status update that says, “My husband and I just had the worst fight ever!”
The world doesn’t need to know that. Yet, I will post about a great dinner he made or another happy part of my day. It’s just how it goes. I don’t think people purposefully try to portray their lives in a perfect way; they just don’t share private details with the public.
Dangers to Finances
You’ve heard of “The Joneses” and how everyone is trying to keep up with them. The thing is, no one would be worried about The Joneses if they didn’t spend so much time comparing themselves to them.
I was very fortunate growing up, but my dad always taught me to never be boastful or showcase our vacations or belongings. He told me many times that there were people far wealthier than we were out there, and acting like I was better than anyone simply because we were upper middle class was rude.
I didn’t truly understand what he meant until I studied abroad one summer in Europe. I took a side trip to Paris, and I was walking down the street when I saw a limo pull up to a hotel. A bellman rushed out and pulled out Louis Vuitton bag after Louis Vuitton bag from the trunk. There must have been 20 pieces of luggage, all extraordinarily expensive.
Standing there with my little backpack as a college student, my dad’s words jumped into my mind. It was only because of his training and instruction that I didn’t stand there envious of the family in the limo. I just acknowledged via a detached comparison that they were extremely wealthy, and I was not. It was a world I’d never seen before and will never be a part of. It was an excellent reminder that sometimes, you simply can’t measure up to others in some ways so comparison is futile.
Still, there are people who try to attain this level of wealth through gathering possessions that very wealthy people own, whether they can afford it or not. This includes the young 25 year old who buys a $1,000 La Perla swimsuit instead of a $30 Target one. It includes the young couple who are buying a first home but insist on the 3,000 square foot house on the lake that they “deserve.”
Comparisons, especially negative comparisons, lead people to live well beyond their means every single day. Whether it’s something small like buying a designer dress that your friend has or something big like booking an expensive vacation to try to one up your wealthy coworker, comparison can drive your finances into the ground.
I know it’s hard to resist comparing yourself to others, since it’s a natural part about being human. However, next time you find yourself wishing your life resembled someone else’s, take a little bit of time to think logically about the situation and acknowledge what’s great about you just being you.
How about you all? What comparisons do you yourself or you see others making that might be negatively affecting them?
Share your experiences by commenting below!
***Photo courtesy of http://www.flickr.com/photos/laruth/345492908/sizes/o/
Google Drive, Dropbox, and Box – A Review of Cloud Storage Options

 This is a post by MPFJ staff writer, Jeff. Jeff writes about sustainable living and finances at his website, Sustainable Life Blog. Jeff really enjoys traveling with his wife as much as he can, to wherever he can.
Over the last 5 years, there has been this huge buzz in computing about the “cloud”.
Everyone talks about leveraging the resources of the cloud, storing your data in the cloud, but what exactly do they mean when they talk about the cloud, and how can you use it to help you?
Well, the cloud is simply online data storage. It works exactly like the hard drive on your computer, except you can access your data from any computer with an internet connection. The service is pretty handy because it allows you to access (or share) pictures, documents and other stuff over any internet connected device. I keep trying to use it as much as possible, but old habits (mainly MS office) die hard. I’m starting to get everything into the cloud though, and it’s making life easier for me.
There are a lot of different cloud services out there, but the main 3 are Google Drive, Dropbox, and Box.
I’ve used each of them for different purposes and each has some advantages and disadvantages, so we’ll go over everything and let you decide what one (if any) of these services meets your needs. The most popular (and one I’ve been using the longest) is Dropbox, so we will start there.

Dropbox
The one that I’ve been using for the longest is Dropbox.
There are two versions of the service, a free and paid version.
Free Version
- The free version comes with 2gb storage space, and you can expand that up to 18 gb for free by referring friends to the service.
- I’ve been using the free version for the entire time, and while I’ve deleted stuff out of there that I no longer use, I’ve never gone above 70% utilization of space. The free version has suited me just fine so far.
Pro Version
- However, if you plan on needing more space than that, there’s a pro version of Dropbox that costs 9.99/mo (Or $99/yr) and gives you 100gb of space – nearly 50x what a free account does.
- This would be valuable if you’re interested in putting ALL your data in Dropbox as a backup, but that’s not how I’ve been using it thus far. I just use it for a few files that I need access to frequently.
The best part about Dropbox is that you can get to it from everywhere. They have great apps for andriod (and iphone, but I havent used that one) as well as desktop apps for mac & pc, and a web interface. They make it super easy to upload and download files from their server.
Below are the Dropbox app links:

Google Drive
The next one on our list is Google Drive.
- Google Drive has a free version that will give you 15gb for free (though this is combined with your Gmail and Google photos),
- And they have tiered pricing for paid plans, allowing from 100gb (4.99/mo) to 16 tb (799.99/mo).
- This is half the price per month compared to Dropbox for the same amount of space!
- Personally, I think that 15gb will be fine for 99% of the population, but you’ll need to decide that for yourself.
Google Drive is more than just a file storage/upload area though. There are apps built into Google Drive, that will help you make documents and spreadsheets, forms and surveys and even do drawings, all of which can then be saved in your Google Drive and shared (if need be).
(From Jacob:) However, one disadvantage that presents itself with Google Drive is that to my knowledge, you cannot open your Google Drive folders on your desktop using MS Office applications. Instead, you can only edit directly from the Google Drive website.
In addition to creating documents with Drive, you can also share them with people. They can have view permissions or edit permissions, allowing you to collaborate on things with others. My wife and I use this a lot when we were wedding planning to do the guest list, favors, vendors and more.
Just like Dropbox, Drive is with you anywhere you go, and you can access and edit from a computer or your phone with the Google Drive apps, which can accessed by clicking the links below.

Box
The last alternative we will discuss is Box.
- With Box, you can get 10 gb of file storage in their cloud for free, with a maximum file upload size of 250mb.
- If you need more than that, you can move to a personal paid plan with Box, which will get you 100 gb storage online, and a 5 gb upload limit, for $10 per month.
With Box, you can share folders for others to edit and collaborate on the documents inside, or even assign tasks (perhaps to yourself). Personally, I haven’t put this app much through the ringer as much as I have Drive and Dropbox, but from what I can tell box is a pretty solid option if you’re looking to store files online. However, there are some complaints about the small (250mb) file upload limit.
Below are the links to the apps if needed:
Conclusion
There are 3 pretty good apps here, and because of the document creation, I think that Google Drive is the most robust, although maybe not suited for folks who like to edit documents inside MS Office applications. Even though Dropbox has the lowest amount of storage space, it’s the one that I’ve been using most (and will continue to use). I’ve never bumped up against my limit, but then again I’m not a heavy user.
If you think you’ll be a heavy user, consider looking at one of the options with a larger amount of storage space. As always, evaluate your needs before choosing, but with any of these three, you cant go wrong.
How about you all? Do you use any cloud storage services? If so, which one?
What features do you specifically look for in cloud storage services?
***Photos courtesy of http://www.flickr.com/photos/joeybones/6779772214/sizes/o/, http://img.talkandroid.com/uploads/2012/12/Dropbox-Logo.png, http://www.ozom.cl/wp-content/uploads/2013/09/Google_Drive_Logo-1000×288.jpg, http://www.techtuple.com/wp-content/uploads/2012/03/Box-Android-Apps-on-Google-Play.png
Is It Worth It to Make a Non-Deductible, Non-Roth IRA Contribution?

 The following is a post by MPFJ staff writer, Kevin Mercadante, who is a professional personal finance blogger, and the owner of his own personal finance blog, OutOfYourRut.com. He has backgrounds in both accounting and the mortgage industry.
The widespread popularity of 401(k) plans has made IRAs – at least traditional IRAs – something of a minor league play these days. Most people will take them only if they are able to get a tax deduction for the contribution. If they can’t – or they merely think they can’t – they may not even bother making a contribution of all.
That’s not always the right choice. In fact, in most cases, it’s the equivalent of leaving money on the table. Here’s why…
The Basics of Traditional IRAs
For 2014, you can contribute up to $5,500 toward an IRA, plus an additional $1,000 under the “catch-up provision” if you’re 50 or older. This is unchanged from 2013. You can make a full contribution, and deduct the full amount of the traditional IRA contribution from your income taxes, if neither you nor your spouse are covered by a pension plan through your employer.
But even if you or your spouse are covered by a retirement plan at work, you can still contribute the full amount to an IRA, but there are limits as to how much of the contribution you can deduct for income tax purposes.
If you are covered by an employer sponsored retirement plan. If you are single, you can deduct the entire amount of the IRA contribution for tax purposes if your modify adjusted gross income, or MAGI (click here for a definition of MAGI;), does not exceed $60,000. At that income level, your deduction begins to phase out, up to $70,000, where disappears completely.
If you are married filing jointly, you can take the full IRA deduction on a MAGI of up to $96,000. At that income level, your deduction begins to phase out, up to $116,000, where disappears completely.
If you are NOT covered by an employer sponsored retirement plan, but your spouse is. You can take a full IRA deduction if your combined MAGI does not exceed $181,000. At that income level, your deduction begins to phase out, up to $191,000, where it disappears completely.
Statistically at least, that means that most people are entitled to take a tax reduction on the full amount of their traditional IRA contribution, even if they or their spouse are covered by an employer pension plan.
But what if your income level exceeds these limits? Is it still worth it for you to make a traditional IRA contribution – even if you won’t get a tax deduction for it?
Absolutely.
Your traditional IRA contributions may not be tax deductible, but your investment gains will still be tax deferred
People often forget that while the tax deductibility of retirement contributions is a nice feature, the real power of tax-sheltered retirement plans is the ability of your money to grow on a tax-deferred basis. Any money that you put into a retirement plan – including an IRA – can grow without regard to tax consequences. That enables faster growth as a result of the full compounding of investment returns.
This is a benefit that you should never forgo, even if the actual contributions are not deductible for income tax purposes.
Building tax diversification into your retirement plan
While it’s true that the inability to deduct your IRA contributions is a limitation, there is a back-end benefit that kicks in when you retire. The non-deductible contributions that you made into your IRA will not be subject to income tax when the money is withdrawn. No tax savings on the way in, no tax paid on the way out. Simple.
This means that at least some of your retirement portfolio will come back to you free from tax consequences. This will provide you with a certain amount of tax diversification, already built into your retirement portfolio.
More rapid accumulation of retirement assets
There’s an even more obvious benefit to putting money into an IRA even if it isn’t tax-deductible. The more money that you save for retirement, the more quickly it will grow.
Imagine making the maximum 401(k) contribution each year. Now calculate in the impact of annual contributions of $5,500, or $6,500, on top of that. If you’re maxing out your 401(k) contribution at $17,500 per year, adding an additional $5,500 through an IRA will increase your annual retirement funding by more than 30%.
With or without a tax deduction for the actual contributions, adding money to an IRA is a way of getting more investment capital into a tax sheltered investment plan. That’s always a solid strategy, and a necessity if early retirement is a goal.
Having more control over your retirement assets
Though 401(k) plans are the best way to accumulate large amounts of retirement capital for most people, they’re not always the best investment vehicles. Since the plan is run by your employer – or your employer’s trustee – you will have little control over the plan, other than deciding allocations. And those allocations are usually restricted to a limited number of investment options.
An IRA, by contrast, is completely under your control and therefore self-directed. You can choose the investment company that you hold the account with, and do so in a way that will not only maximize investment choices, but also give you the ability to trade what you want.
For example, let’s say that you like to trade individual stocks. A typical 401(k) plan won’t provide that ability. Your investment choices are typically limited to a small number of funds, a single family of funds, or maybe company stock. But with your IRA, you’ll be able to trade not only stocks, but also funds in any fund family you choose.
An IRA will provide you with the kind of investment flexibility that a 401(k) plan – or other employer-sponsored retirement plan – typically won’t.
Consider contributing to an non-deductible IRA even if you can’t take the tax deduction for the contributions you’re making and do not qualify for contributing to a Roth IRA. There are just too many advantages to doing so.
How about you all? Have you ever made non-deductible IRA contributions? Why or why not? What do you feel some of the advantages or disadvantages would be?
Share your experiences by commenting below!
Reference sources: IRS IRA Contribution Limits, 2014 IRA Contribution and Deduction Limits – Effect of Modified AGI on Deductible Contributions If You ARE Covered by a Retirement Plan at Work, and 2014 IRA Contribution and Deduction Limits – Effect of Modified AGI on Deductible Contributions if You are NOT Covered by a Retirement Plan at Work.
***Photo courtesy of http://www.flickr.com/photos/lendingmemo/11745940785/sizes/n/
The Worst Valentine’s Day Gift Ideas

 The following post is by MPFJ staff writer, Shondell of Call Me What You Want, Even Cheap. She blogs about her recent car loan and mortgage pay off and a whole bunch more. Check out her blog right here.
Valentine’s Day is for giving your sweetheart beautiful gifts in order to win her heart or to show how much you care.
A gift given on this day should be such that it touches your significant others heart and makes her think fondly of it until the next V-Day. Sadly, some men are not the greatest at giving gifts and may need some assistance on what not to buy their partner.
Here are some of the worst Valentine’s Day gift ideas:
- Lingerie: Giving lingerie in the early days of dating is like extending a direct invitation to you know what….. It would probably be a great idea if you are already a couple and deeply in love, but a woman you just started dating may find it insulting. Depending on her personality, she might just ignore it and never call you again, which would be quite sad if you really liked her.
- Chocolates: If your partner is not a chocolate lover, and or if she’s on a diet, then chocolates are a definite no, no. So ignore the commercials about chocolates being great Valentine’s Day gifts, it will only work if she really likes chocolates, so be sure to know this before you decide to buy any.
- Fifty Shades of Grey, the novel: There may be a lot of buzz on the internet about the erotic novel “Fifty Shades of Grey” and it may have become a bestseller, but that doesn’t mean women like to see themselves in the same role as the masochistic Anastasia Steele. Giving the novel as a gift on Valentine’s Day is like making an open invitation to her to play the role of Anastasia with you as the sadistic Christian Grey. No thinking woman would appreciate this gift.
- Diamond ring: Unless your sweetheart is already married to you, giving a diamond ring to her is a bad idea. If she is deeply in love with you, she might think it’s as a proposal and if it is not, then it would be very awkward for the both of you. If she is not in love with you or has no intention of getting hitched with you, then it might simply drive her away. With that one diamond ring you could hurt her feelings or cause her to end the relationship.
- Plastic roses: A bouquet of roses is fine for Valentine’s Day. But never make the mistake of giving plastic roses. Sure, they look beautiful, but they may send a negative message. She might think that you have a cold and insensitive heart and toss it in the trash. It also sends a message that you are extremely cheap, so if you don’t want her to view you as being cheap, get the real ones!
- Deodorant: This one is obvious, and although your intentions may be in the right place, it just sends the wrong message. Imagine getting deodorant from anyone you know. Maybe if it was packaged with body wash, soap, and perfume it wouldn’t be as bad, but let’s be honest if someone gave me deodorant, I would definitely be offended.
- Tools: Have you ever gotten a gift that your significant other wanted for themselves, and instead of just buying it for themselves, they purchased it for you, knowing full well that they will be enjoying it and not you? This happened to someone I know. She got an electric saw! I laughed when she told me, and said he might as well have not gotten you anything. Don’t get me wrong, a gift is a gift, and we should all be grateful, but if your wife/girlfriend has never used a hammer, chances are she won’t enjoy a tool.
- A Gym Membership: This one could go either way, but to avoid an argument, I would not recommend this as a gift. The first thing that may go through your partners head is “Is he trying to tell me I need to lose weight?” Especially if there was never a conversation about joining a gym, and then all of sudden BAM! A gym membership.
How about you all? What’s the worst Valentine’s Day gift you’ve gotten?
Share your experiences by commenting below!
***Photo by Justin Lucarelli
Can You Invest In Real Estate With An IRA or 401(k)?

 The following is a post by MPFJ staff writer, Kevin Mercadante, who is a professional personal finance blogger, and the owner of his own personal finance blog, OutOfYourRut.com. He has backgrounds in both accounting and the mortgage industry.
The short answer to this question is yes. But, the real question that needs to be answered is why would you even want to? That’s the issue were going to take a look at here.
You can – but you probably can’t invest in real estate through your 401(k) plan
Confused? Though the IRS does not specifically prohibit investing in real estate through a 401(k) plan, employers and plan trustees are almost unanimous in avoiding it. This is particularly true when it comes to investing in a specific piece of property for the benefit of a single plan participant. There are technicalities and prohibitions (discussed in more detail below) that make direct investing in real estate a nightmare for retirement plan trustees. You can inquire of your plan trustee whether or not this will be permitted, but it’s 99.9% certain that the answer will be no.
There are articles and experts who will advance the cause of buying real estate with a 401(k) plan, but there’s some sleight-of-hand involved in the discussion. What is typically advocated is borrowing against your 401(k) plan to provide at least some of the funds for the purchase of a specific piece of property.
Under IRS regulations, 401(k) plans are permitted to loan out up to 50% of the participants plan value – to a maximum of $50,000 – to the participant. This money can be used as a down payment for the purchase of property.
However, even if you are going to engage in this practice, you will be leveraging your retirement plan in order to buy a real estate investment which itself will be further leveraged.
Let’s say that you borrow $50,000 from your 401(k) to make a 20% down payment on a $250,000 property. The remaining $200,000 will come from a mortgage directly secured by the property itself. That means that your investment in the property – which itself is a risk investment – will be 100% leveraged. That’s an even bigger risk.
If the investment blows up for any reason, you’ll not only lose money on the property, but you also lose some or all of the money borrowed from your retirement plan.
I believe that’s called double jeopardy.
You can with an IRA – and also SEP or SIMPLE IRAs, or Solo 401(k) plans
What do all these plans have in common? They’re all self-directed plans. For that reason it’s theoretically possible to invest directly in a specific piece of real estate through the given retirement plan. Since you have direct control over the plan, you can structure it in a way that will permit you to do this.
But there are some restrictions, and that’s where this gets messy.
When you purchase real estate in your retirement plan, all funds used to purchase the property must come out of that specific retirement plan. Any income earned by the property – including proceeds from the ultimate sale of the property – must be returned to the retirement plan.
There’s an even bigger restriction: if you purchase real estate in your retirement plan, you cannot personally manage the property in any way. This is the limitation that makes ownership of real estate through a retirement plan technically impossible for small real estate investors.
If you are buying a property for the purpose of managing and profitably selling for a big gain, you’ll automatically disqualify both the investment – and your retirement plan. All investment within a retirement plan must be handled on an arm’s-length basis. That means that in order to comply, you’ll have to hire a management company to run the real estate investment for you.
You won’t be able to manage property any way. You will not be able to work on physical maintenance or remodeling of the property, market rentals, screen tenants, collect rents, or pay bills. With those restrictions, you’re better off making a paper investment in real estate through third-party sources.
Direct management of the property is considered a prohibited transaction under IRS retirement plan rules. And there are other such prohibited transactions (For a more detailed discussion of prohibited transactions, please check Retirement Plans FAQS Regarding IRA Investments).
If you engage in a prohibited transaction with your retirement plan – something that is very easy to do when investing in real estate – the IRS can literally invalidate your plan. If they do, your entire plan will be considered distributed, and you’ll be subject to ordinary income tax, plus a 10% early withdrawal penalty.
Should you invest in real estate with your retirement plan?
In a word, nope! Even though the IRS says you can invest in real estate with certain retirement plans, that doesn’t mean you should. There are too many reasons why you shouldn’t.
Losses are not tax deductible. This is a risk of all capital investments, but much more so with real estate. For starters, real estate often operates at a loss especially in the early years. You won’t be permitted to deduct those losses. And if the entire investment goes sour, you won’t have the benefit of capital loss deductions. There’s no upside to investing in real estate through a retirement plan if the investment goes bust.
Real estate is not a liquid investment. One of the difficulties with real estate in general is a fact that it‘s not particularly liquid. Not only can it be difficult to sell an individual property, but you may need to hold onto it for many years before it becomes truly profitable. That will crowd out other potential investment opportunities.
Excessive capital allocation. Since you will have to make the entire real estate investment through your retirement plan, an inordinate amount of the plan will be invested in single asset. Diversification of the portfolio will be close to impossible.
Potential for trouble with the IRS. This gets back to those prohibited transactions we talked about above. The risk of this is substantial.
It will be difficult to find a trustee who will allow it. Just because the IRS permits real estate investment for certain retirement plans doesn’t obligate trustees to offer it. For all the reasons listed above – plus an almost impossible administrative burden – most retirement plan trustees will not permit you to hold real estate in the plans.
Investing in real estate through your retirement plan – an interesting concept, most definitely – but not one you should participate in. As an alternative, you can hold real estate investment trusts (REITs) in your retirement plan, as well as stocks and funds that are primarily engaged in real estate related activities. Or you can purchase investment real estate with non-retirement funds, and enjoy a whole lot more flexibility – as well as generous tax benefits.
How about you all? Have you ever thought about investing in real estate with one of your retirement accounts? Do you know anyone that has done this type of thing?
Share your experiences by commenting below!
***Photo courtesy of http://www.flickr.com/photos/9731367@N02/6988181354/sizes/n/
$168.15 – Community and Charity 10% Monthly Blog Income Give Back # 29 – February 2014 Edition

 The 10% give back giveaway fun rolls on for the month of February.
In case you missed the first 28 editions of the 10% Blog Income Give Back, after doing some thinking at the beginning of October 2011 about what direction I want this blog to grow and evolve towards in the future, I decided that any income made from this blog would have more significance to me at a personal life values level if I knew that a portion were being given back to the following places:
- 1) The readers – Obviously, without you here to read my articles and interact with my ideas, there would be no blog in the first place (let alone blog income). As such, it is only fitting that you receive a portion of any blog income.
- 2) Charitable organizations – If you’ve read my blog before, you know that I’m a big believer in donating a portion of my money to charity. Each year, I donate between 5-10% of my income to the National Multiple Sclerosis Society as part of the Bike for MS fundraiser that I do. Beyond the good that is done by donating your money, getting used to contributing to charity is also a good practice to emulate the actions of affluent individuals (T. Harv Eker discusses this in his book, Secrets of the Millionaire Mind, which I would definitely recommend reading if you have a few hours).
Because of these considerations, I’ve decided that each month going forward, I’m going to give away 10% of my net (after-tax) blogging income/profit to My Personal Finance Journey readers (5%) and to charity (5%). Listed below is a summary of the results we’ve achieved together thus far through this give back effort:
- After each calendar month passes, I’ll tally up my net blog income and determine what Dollar value correlates to 10%.
- So far, I’ve been very happy with the success of the October 2011 – January 2014 give backs. Listed below is a summary of what we’ve accomplished so far with the give back effort.
- Current total given to charity = $2,382
- Current total given to blog readers = $1,078
So, that’s the overall flow of things and a brief recap of what’s happened so far with the give back initiative. Now, let’s get in to the specific details for this month’s (February 2014) giveaway.
Details of February 2014 10% Blog Income Giveaway
- $168.15 total blog income to give away – $84.15 to 2 total My Personal Finance Journey readers and $84 to the National Multiple Sclerosis Society (which I just donated today!).
- $84.15 in the form of 2 prizes available to 2 readers as follows –
- 1) Grand Prize = $50 cash via PayPal.
- 2) Runner-up – 2nd Place Prize = $34.15 cash via PayPal.
- $84.15 in the form of 2 prizes available to 2 readers as follows –
How to Enter the Giveaway – Deadline to Enter is 11:59 PM, February 28th, 2014
Like previous months, I’ve decided to use the RaffleCopter giveaway management tool to handle sign-up facilitation for this giveaway, so simply go through the steps listed in the widget below to enter the running for the prize and accumulate entry points.
There is no limit to the amount of points you can earn. If you refer 10 subscribers – your name will have accumulated 170 entry points! Or, if you link to the giveaway more than once, you can accumulate those 10 entry points multiple times. You can also share other My Personal Finance Journey articles via social media sites once per day. In the event of a tie, I will be using a random number generator to select the grand prize and runner-up (2nd place) prize winners.
Important instructions: After you complete an entry method, make sure to click and fill out the “I Did This” or “Enter” button in the widget so that I have a record of your points.
Remember, the deadline for entries will end at 11:59 PM, February 28th, 2014 (~2.5 weeks from today – the start of the give back). Good luck to you all! Please contact me if you have any questions. After the deadline for entries passes, the grand prize and runner-up prize winners (one with the most points and second most points accumulated, respectively) will be contacted via email to receive their prizes.
***Photo courtesy of http://www.flickr.com/photos/kouchi/151196377/sizes/o/